How to improve the quality of a selfie video to facilitate motion analysis
In a previous article, I described how sharing selfie videos with healthcare professionals can facilitate motion analysis for the management of painful musculoskeletal syndromes, injury prevention, and performance enhancement.
This article describes how to improve the quality and standardize the process of capturing selfie videos to facilitate the motion analysis process.
I am a healthcare clinician, not a videographer. However, from self-taught processes and experiential learning, I have come to recognize considerations to achieve quality selfie video necessary for valid motion analysis.
Lighting: When recording video outside avoid early morning, and dusk. Arrange the light source from the sun, light from a window, indoor lights, selfie light ring behind the camera.
Notice in the image below on the left the light source is behind the subject, whereas image below on the right the light source from the window is behind the camera. The image on the left is much better quality.

When capturing video recording outside have a shady area available nearby to review the recording.
Camera position – orientation: Consider which type of computer screen the analysis of motion will occur when choosing whether to orient the smartphone in portrait vs landscape.
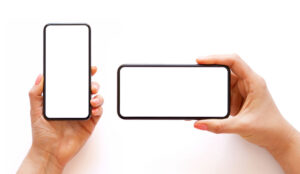
Video playback of recording on a computer screen or TV monitor the screen is wider than taller, so capturing video recording in the landscape is better.
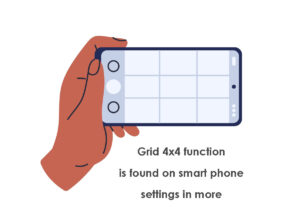
Using the “grid” option on the camera helps improve the orientation of the camera relative to the subject and the environment to improve the quality of the video recording. This option is found under the camera settings “more” function.
It is best to hold the camera at the height of the center of action. For most activities that means the camera should be at the height of the “belt line”. A selfie stick with a tripod can hold the camera steady at the height of the belt line.
Frames/second – slow-motion capture: Consider the speed the subject is moving when choosing the camera mode of slow motion versus regular speed recording.
The speed of normal walking capturing the video at the camera’s default setting of 24 to 30 frames/second provides acceptable quality. The camera's default frames/sec setting takes less storage space and less lighting. Whereas recording at a camera setting of slow motion or higher frame rate takes more storage space and needs more illumination lighting.
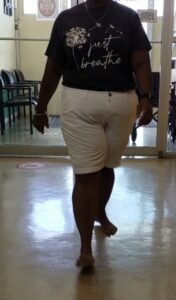
Staging: Choose clothing to be able to visualize key bony landmarks. Avoid wearing unicolor clothing or the “ninja effect”.

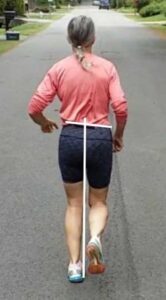
It is important to be able to visualize the pelvis, knee, and for upper extremity problems the shoulder blade and elbow. In the picture above the image on the left I describe as the “ninja effect”, cannot visualize the orientation of the pelvis nor the back of the knee. In the image on the right, the contrasting color of clothing, and exposure of the back of the knee improve the quality of the video.
Two dimensions are nice, but three dimensions are better. Capturing video recordings from more than one view or angle can provide more information. Standard practice when analyzing radiographic images is to obtain at least two views. This concept is applicable to analyzing 2D videos.
When trying to analyze and measure the same thing from different angles there will be different measures because of different orientations camera angles and different points of reference. Orienting the camera and subject so movement towards and away from the camera is helpful, but orienting the camera to visualize the side of the individual provides different information.
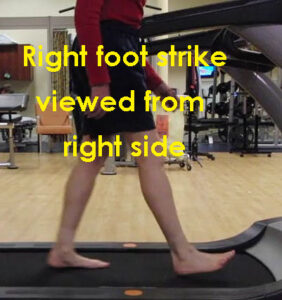
For example, comparing the angle of the foot relative to the ground at foot strike it is important to capture recording from both the right side of the body and from the left side of the body.
Using smartphone video has benefits for problem-solving musculoskeletal pain syndromes, and movement system problems, preventing injury, and enhancing sports performance.
If a picture is worth a thousand words what is a video recording worth?
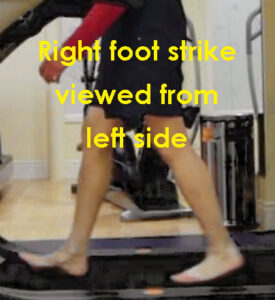
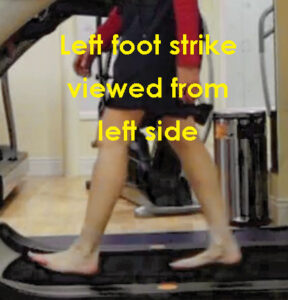
The left image above shows the left foot strike. The angle of the foot relative to the ground is much less than the image above on the right showing the right foot strike angle of the foot relative to the ground.
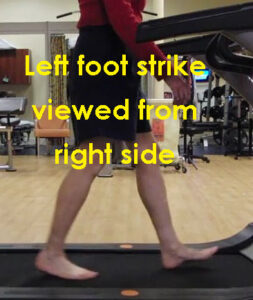
Analysis based on comparing movement from one side of the body to the other side of the body to determine if there is asymmetry of movement requires capturing a recording from both sides of the body.
Because of the parallax effect measurements from camera images, the line of site needs to be at right angles. The parallax effect is different in the apparent position of an object viewed along two different lines of site.
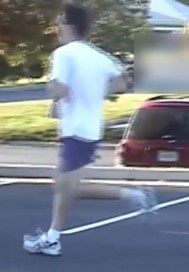
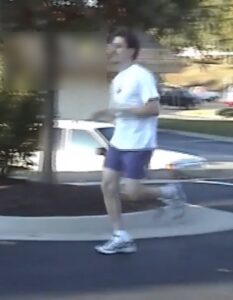
The 3 images above are 3 consecutive right foot strikes. The image in the middle is the subject at right angles or orthogonal to the camera. When the subject is at right angles to camera provides an image for valid measures and observations.

There are three possible techniques when capturing a video recording to deal with the parallax effect to obtain valid measures.
- The individual moves relative to a still camera. For example, walking on a treadmill the individual is moving the camera is still. Unfortunately, most treadmills are right next to the wall preventing capturing video from both the right and left side of the body.
- The individual moves relative to a still camera. In this case, multiple laps of a triangle (see below) provide enough samples of frames when the subject is perpendicular or orthogonal to the camera.
- The individual moves and the camera moves. This requires a camera selfie stick with a camera stabilizer. Using a 360° camera on a selfie stick is also a possibility.
The video below illustrates a technique that facilitates getting 4 views, from the left side, the right side, the front, and the back side by walking/running a triangle with 60° turns.
Sharing selfie video for motion analysis: When sharing a selfie video with healthcare professionals unless it is a very short clip of less than 10 seconds around a 25 MB size video file it cannot be sent via email. If you can edit video files and delete sound this decreases the number of MB. Additional software applications may be needed to convert video file formats to share video files across conflicting computer operating systems. Sharing a selfie video with healthcare professionals can occur by uploading the video to a file transfer protocol website. Sharing a selfie video with healthcare professionals for motion analysis to manage painful musculoskeletal syndromes, prevent injury, and improve movement performance.
The information on this website is not intended or implied to be a substitute for professional medical advice, diagnosis, or treatment. You are encouraged to perform additional research regarding any information contained available through this website with other sources and consult with your physician.
Damien Howell Physical Therapy – 804-647-9499 – Fax: 866-879-8591 At-Home, At Office, At Fitness Facility – I come to you, I do home visits Damien@damienhowellpt.com